
Maintaining the reliability and efficiency of commercial washing machines is crucial for any business relying on laundry operations. Bearings are a fundamental component that often go unnoticed until problems arise. This article explores the essential role of washing machine bearings, key signs of wear, and practical maintenance tips to ensure your machines run smoothly and last longer. Whether you manage a laundromat, hotel, or any facility with heavy laundry needs, understanding these components can significantly impact your operational success.
What is a Washing Machine Bearing?

Washing machine bearings are critical components that support the drum’s rotation, enabling smooth and quiet operation. Positioned at the rear of the washer beneath the outer tub, these bearings ensure the drum rotates correctly.
Typically, they can last up to a decade with proper care, but factors like regular use and water exposure can cause them to wear out over time, leading to noise during the spin cycle and excessive drum movement. When bearings wear out, they may need to be replaced to maintain the washer’s performance.
What Causes Washing Machine Bearings to Fail?

Washing machine bearings are essential for the smooth operation of the drum, supporting its rotation with minimal friction. However, these components can fail due to a variety of reasons, which can lead to noisy operation and reduced efficiency. Here’s a comprehensive look at the causes of washing machine bearing failure:
Overloading the Machine
Exceeding the recommended weight limits of the washing machine places excessive pressure on the bearings. This additional strain can lead to premature wear and eventual breakdown of the bearings.
The stress from overloading can also misalign other components, such as the drum and motor, which puts further strain on the bearings.
Water and Detergent Ingress
Bearings are designed to operate in a dry environment within the machine. However, over time, water can seep past the protective seals, especially if these seals are worn out or damaged.
The presence of water leads to rust and corrosion of the bearings, significantly reducing their lifespan. This issue is exacerbated by harsh detergents, which can further degrade the seals and accelerate water ingress.
Insufficient Maintenance and Cleaning
Regular maintenance, including cleaning and checking the integrity of seals, is crucial to extend the life of washing machine bearings.
Accumulation of dirt, fabric lint, and detergent residues can cause the bearings to work harder than necessary, increasing wear. It can also lead to the deterioration of seals, allowing water and detergent to reach the bearings.
Improper Installation and Balancing
If a washing machine is not properly installed or balanced, it can cause uneven loads and vibrations during operation. These vibrations can cause bearings to wear out unevenly and prematurely.
Ensuring that the washing machine is level and securely installed can help in reducing undue stress on bearings.
Aging and Wear and Tear
Like all mechanical components, bearings have a natural lifespan. Regular wear and tear from the drum’s constant rotation will eventually degrade the bearings.
Bearing lifespan can vary depending on the washing machine’s model and the frequency and type of usage.
Addressing these issues involves regular inspection, not overloading the machine, using appropriate detergents, and ensuring that the washing machine is installed correctly and maintained regularly. This proactive approach can help extend the life of washing machine bearings and ensure the appliance operates efficiently.
Signs and Symptoms of Bad Washing Machine Bearings

Here are some common signs that your washing machine bearings might be going bad:
Loud Noises: If you hear grinding, rattling, or knocking sounds during the spin cycle, it’s a clear sign that the bearings are wearing out. These noises start quiet but get louder over time, to the point that you might even hear them outside your home.
Vibrations: Faulty bearings can also cause your washing machine to vibrate more than usual during the spin cycle. Initially, these vibrations might be mild, but they can intensify to the point where the machine shakes significantly.
Trouble Spinning: If your washer seems to struggle to spin or spins slower than usual, this could be due to old and inefficient bearings. In severe cases, the washer might not spin at all.
Grease Leaks: Seeing grease outside your washer is a bad sign. It usually means the bearings are breaking down and the lubricant is leaking.
Metal Shavings: Finding metal fragments in the drain after washing can indicate that the bearings are deteriorating and breaking apart.
Unbalanced Loads: If your washer often seems unbalanced, it could put extra stress on the bearings, causing them to wear out faster.
Overheating: An overheating washing machine could mean the bearings create too much friction. This might also be caused by other issues like a blocked drain or a malfunctioning heating element.
Loose Drum: If the drum in your washer moves too much or seems loose, it’s likely due to worn bearings.
What is the Cost to Replace a Washing Machine Bearing?
Replacing the bearings in your washing machine might cost anywhere from $100 to $600. This price covers the bearings, oil seals, and the fee for a professional to install them. Front-loading washers are usually cheaper to fix because they have fewer parts than top-loading models, so your final cost might depend on the type of washing machine you have.
How to Replace Washing Machine Bearing?
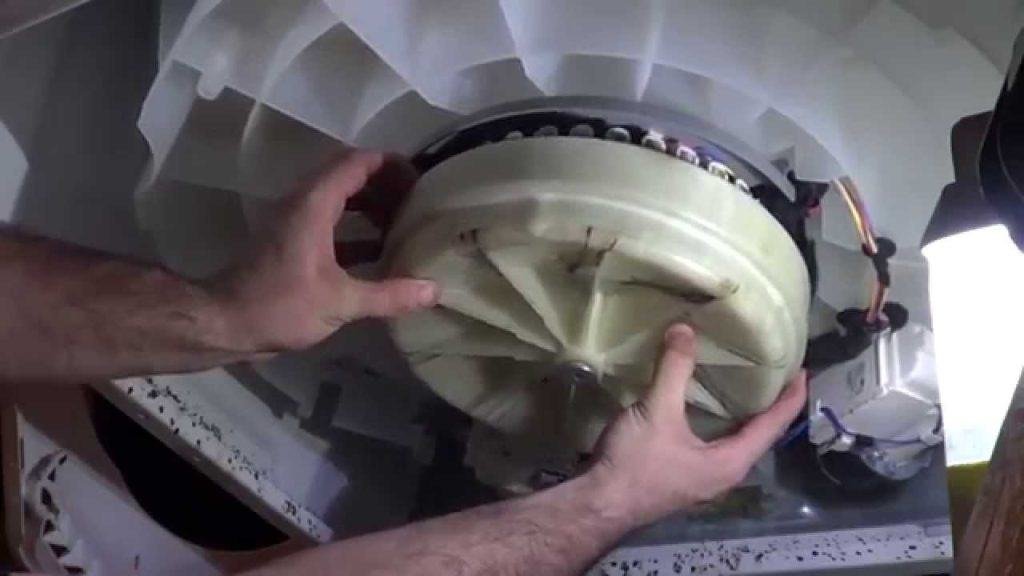
Replacing the bearings in a washing machine is a significant task that requires patience, the right tools, and a bit of mechanical savvy. Here’s a simplified step-by-step guide to help you get started:
Prepare Your Tools and Workspace: You’ll need a Torx head screwdriver, pliers, a 13mm socket, chisel, hammer, silicone sealant, and pieces of wood or similar items to support the machine. Make sure to have all necessary replacement parts: the front bearing, rear bearing, and the bearing seal.
Safety First: Always ensure the washing machine is completely unplugged and disconnected from the water supply before you start.
Access the Machine’s Internals:
Remove the Top Panel: Unscrew the panel at the back using a Torx screwdriver and set it aside.
Remove the Soap Dispenser Tray: Slide out the tray and press the interior catch to release it entirely.
Remove the Control Panel: Unscrew the control panel from the top of the machine. Be careful with the electrical connections – if you need to move the panel, take photos of the connections for reassembly reference.
Remove the Kickplate: This is at the bottom of the machine. Press the clips to detach it and disconnect the drain hose.
Remove the Front Panel: Unscrew the screws holding the front panel at the top and bottom, allowing access to the drum.
Replace the Bearings:
Remove the Drum: Depending on your model, this might involve additional steps, such as removing a drive belt or pulley.
Replace the Old Bearings and Seal: Remove the old bearings and seal, clean the area, and install the new parts. To prevent future leaks, use silicone sealant for the seal.
Reassemble the Machine: Reverse the disassembly steps, ensuring all screws are tight and connections are correctly reattached.
Test the Machine: Run a short cycle without laundry to ensure everything is working smoothly and there are no leaks.
This task can be complex and might vary slightly depending on your washing machine model. If at any point you feel unsure, it may be wise to consult with or hire a professional to avoid potential damages. Refer to your specific model’s manual for detailed instructions tailored to your machine.
How Do You Save Washing Machine Bearings from Getting Faulty?
To extend the life of your washing machine’s bearings and keep the machine running smoothly, consider these detailed preventive measures:
Proper Loading
Stick to the maximum load capacity indicated on the manufacturer’s label of your washing machine to avoid overloading. Exceeding this limit puts too much stress on the bearings, causing them to wear out faster. If you have a lot of laundry, splitting it into smaller loads rather than stuffing everything into one cycle is better.
Use of Mild Detergents
Choose gentle detergents formulated for washing machines. Harsh detergents and abrasive cleaners can accelerate the wear and tear on your machine’s bearings by corroding the protective seals and entering the bearing assembly.
Regular Cleaning
Over time, dirt, lint, and detergent residue can accumulate inside your washing machine, impeded by the bearings’ function. Running a maintenance or cleaning cycle regularly helps clear out these residues. Additionally, make it a habit to clean the drum and the lint filter to prevent buildup.
Lubrication of Bearings
Regular lubrication is crucial to maintain the smooth operation of the bearings. Use a special bearing lubricant or a light machine oil. Apply a modest amount of lubricant to the bearings and rotate the drum manually to ensure even distribution.
Balancing the Load
An unbalanced load can cause an uneven distribution of weight inside the drum, putting additional strain on the bearings. Always try to distribute clothes evenly around the drum. Laundry balancing sheets can also be used to maintain an even load, which helps minimize strain on the bearings.
Monitoring for Leaks
Check regularly for leaks under the machine, which could indicate failing seals or gaskets. Water leaking into the bearing assembly can cause rust and corrosion, significantly reducing the bearings’ lifespan. Repair any leaks promptly to prevent further damage.
Regular Servicing
Schedule regular service appointments to catch and resolve issues before they become major problems. Most appliance repair companies offer maintenance plans that ensure your washing machine is checked and serviced by professionals at least once a year, which can help in detecting issues like faulty bearings early.
Implementing these steps can help prevent bearing failure and thereby enhance the longevity and performance of your washing machine.
Laundry Bearings size chart
| BEARING NUMBER | ID | OD | WIDTH | Type |
| 6208 LL Bearing | 40 | 80 | 18 | Deep Groove Ball Bearing |
| 6306 LL Bearing | 30 | 72 | 19 | |
| 6307 LL Bearing | 35 | 80 | 21 | |
| 6310 LL Bearing | 50 | 110 | 27 | |
| 6311 LL Bearing | 55 | 120 | 29 | |
| 6313 LL Bearing | 65 | 140 | 33 | |
| 6207 LL Bearing | 35 | 72 | 17 | |
| 6206 LL Bearing | 35 | 62 | 16 | |
| 6205 LL Bearing | 25 | 52 | 15 | |
| 6204 LL Bearing | 20 | 47 | 14 | |
| 6202 LL Bearing | 15 | 35 | 11 | |
| 6006 LL Bearing | 30 | 55 | 13 | |
| 22215 EXW33K Bearing | 75 | 130 | ||
| FYR2-30W64 | 2” | 7” | 2.969” | Pillow block |
Conclusion
Replacing the bearings in your washing machine can seem daunting, but with the right tools, a clear guide, and a bit of patience, it’s a task that can significantly extend the life of your appliance and improve its performance. Remember, safety first: always disconnect your machine from power and water supplies before starting.
If you’re unsure about tackling this project on your own or need high-quality bearings and professional advice, don’t hesitate to contact BYWB Bearing https://bywbbearing.com/ for all your bearing needs. They’re here to help ensure your washing machine runs smoothly for years to come.
